


本記事でできること
- 1時間ごとにインターネット速度(上り・下り)を自動測定
- 結果をAWS IoTに送信し、CloudWatchや通知に活用
- 通知・記録・可視化の基盤として使えるIoTシステムを構築
対象読者・前提環境
| 項目 | 内容 |
|---|---|
| 対象読者 | Raspberry Pi と AWS IoT の基本を知りたい方 |
| 想定レベル | 初級〜中級のエンジニア・技術好き |
| 構築環境 | Raspberry Pi OS (Debianベース)、Python 3.9〜3.11 |
| AWSアカウント | 必須(無料枠でOK) |
システム構成図(概念図)
plaintext┌───────┐ ┌────────┐
│ Raspberry Pi │─────▶│ AWS IoT Core │
│ (Speedtest) │ │ │
└───────┘ └───┬────┘
│
┌───────────▼──┐
│ CloudWatch / DynamoDB / SNS│
└──────────────┘
Step1: Raspberry Piの準備
私はコードを書いたりはメインのPCで行うため、パソコンからSSHでRaspberry Piに接続しています。
Windowsの場合はTera Termなどで接続しています。
① Speedtest CLIのインストール
bash
sudo apt update && sudo apt install -y python3-pip
pip3 install speedtest-cli
Step2: ネット速度測定スクリプト(speed_test.py)
Python
import speedtest
import time
import datetime
import json
import os

json_name = '/home/pi/work/speedtest/tmp.json'
os.makedirs(os.path.dirname(json_name), exist_ok=True)

def get_speed_test():
    try:
        stest = speedtest.Speedtest()
        stest.get_best_server()
        return stest
    except Exception as e:
        print("Speedtest init error:", e)
        return None

def test_speed(stest):
    try:
        down = int(stest.download())
        up = int(stest.upload())
        return down, up
    except Exception as e:
        print("Speedtest failed:", e)
        return None, None

def command_line_runner():
    stest = get_speed_test()
    if not stest:
        return

    now = time.time()
    now_str = datetime.datetime.fromtimestamp(now).strftime('%Y/%m/%d %H:%M:%S')
    down, up = test_speed(stest)
    if down is None:
        return

    result = {
        'unixtime': int(now * 1000),
        'datetime': now_str,
        'down': down,
        'up': up
    }

    with open(json_name, 'w') as f:
        json.dump(result, f)

    print("Speedtest saved:", result)

if __name__ == '__main__':
    command_line_runner()
Raspberry Piの場合、以下の場所にプログラムを保管します
/home/pi/python/speed_test.pyvi エディタで編集する場合
vi speed_test.py実行すると以下のような結果が出力されます
python speed_test.py
Speedtest saved: {'unixtime': 1748333480845, 'datetime': '2025/05/27 17:11:20', 'down': 30475683, 'up': 20677325}
Step3: AWS IoT Core 設定
① Thing(デバイス)を作成
- AWSコンソール に接続
- IoT Coreに接続します

- デバイスを接続する
- Raspberry PiがAWSへ接続できることを確認します
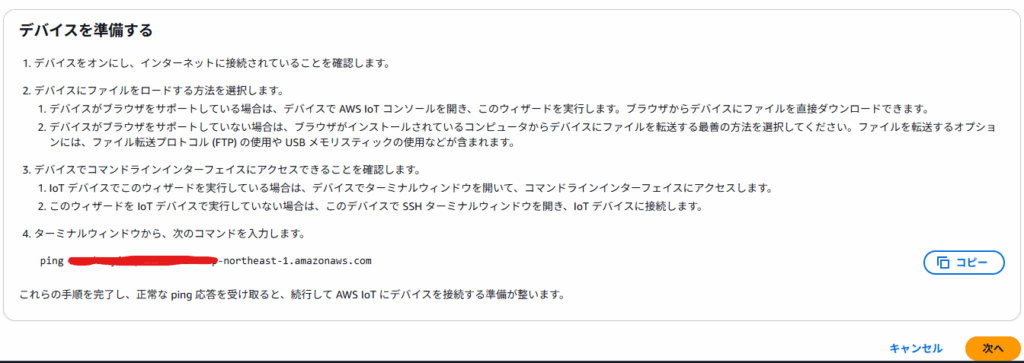
ping xxxxxxxx.iot.ap-northeast-1.amazonaws.com
64 bytes from xxxxxxxx.ap-northeast-1.compute.amazonaws.com (x.x.x.x): icmp_seq=5 ttl=248 time=4.54 ms
64 bytes from xxxxxxxx.ap-northeast-1.compute.amazonaws.com (x.x.x.x): icmp_seq=6 ttl=248 time=4.51 ms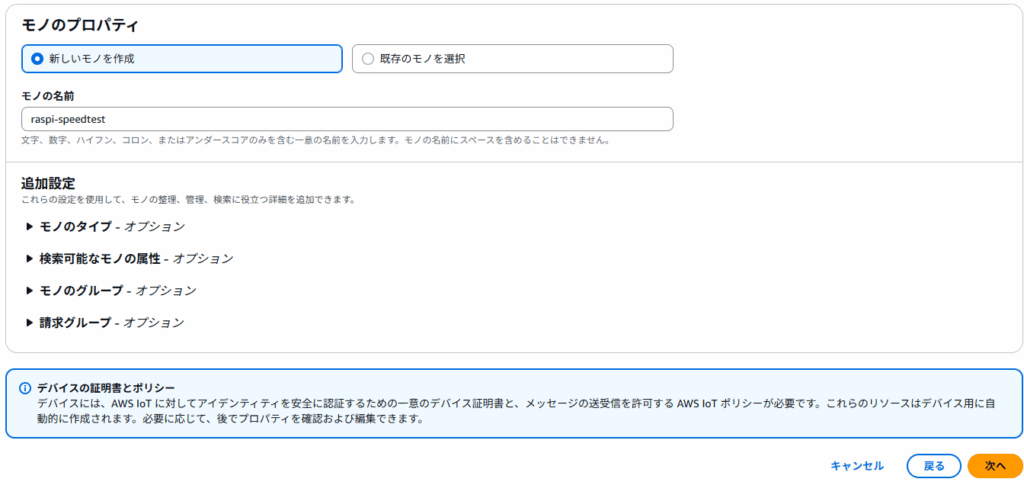
- 「モノ」 → 「作成」
- 名前:
raspi-speedtest
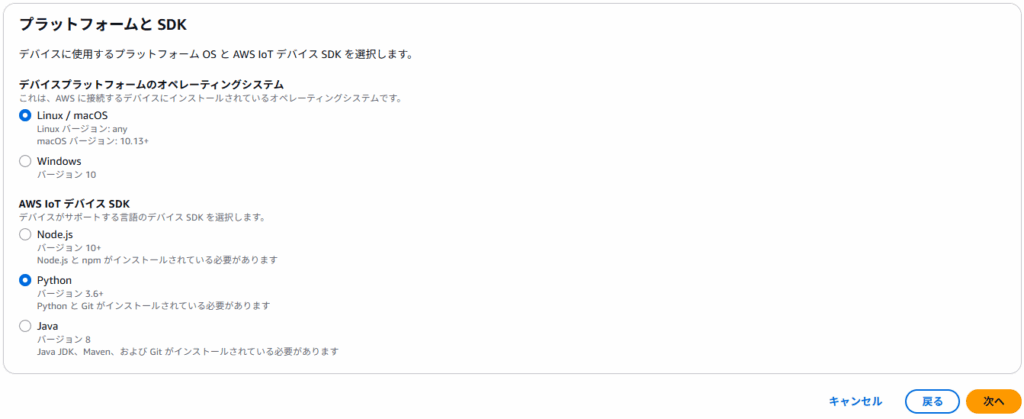
- Linux/macOS でPython を選択
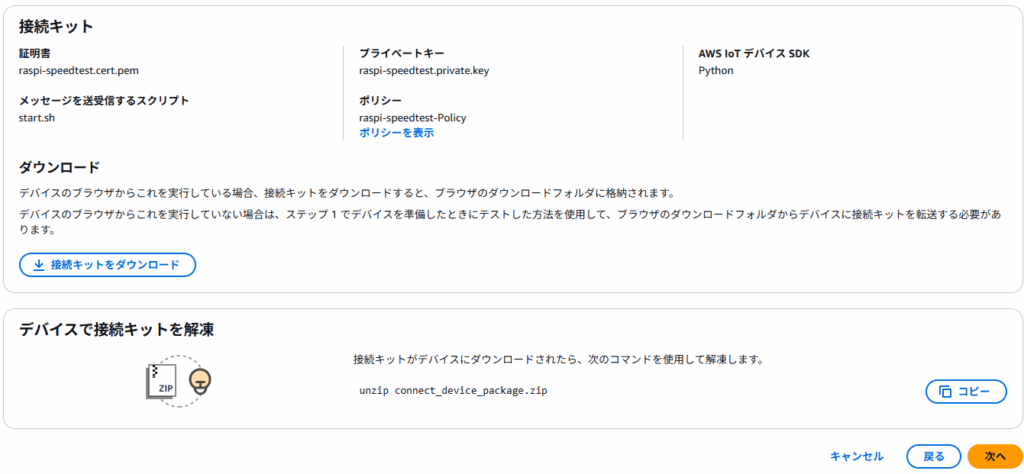
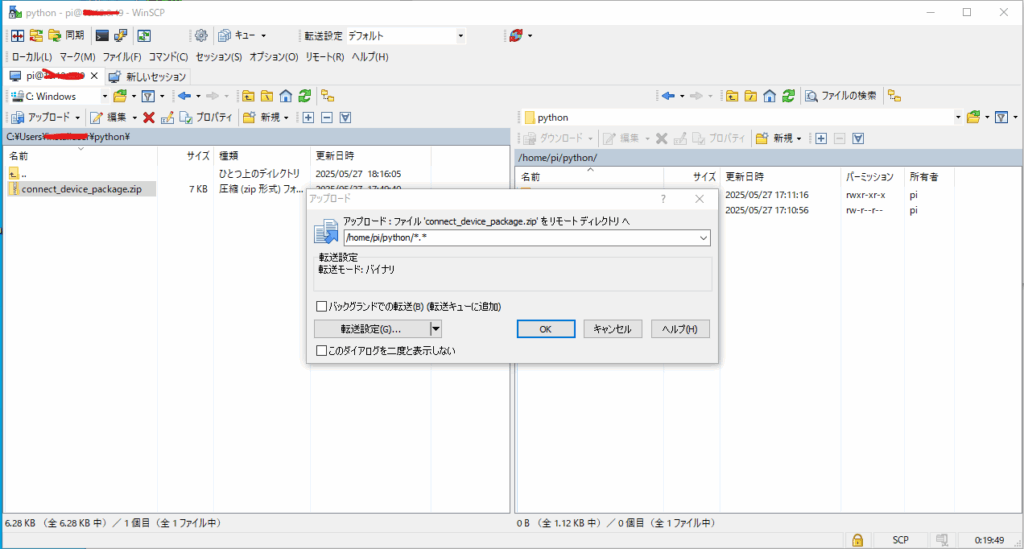
- 接続キット(
connect_device_package.zip)をダウンロードし、Raspberry Pi へコピーする - (WinSCPが便利です)
② 証明書を作成し、ダウンロード
unzip connect_device_package.zipの解凍
unzip connect_device_package.zip
Archive:  connect_device_package.zip
 extracting: raspi-speedtest.cert.pem
 extracting: raspi-speedtest.public.key
 extracting: raspi-speedtest.private.key
 extracting: raspi-speedtest-Policy
extracting: start.sh- フォルダの中身はこのような状態になっているはずです
ls
connect_device_package.zip  raspi-speedtest.private.key  start.sh
raspi-speedtest.cert.pem    raspi-speedtest.public.key
raspi-speedtest-Policy      speed_test.py
chmod +x start.shを実行し、start.shの実行権を付与します
chmod +x start.sh./start.shを実行します
./start.sh- 実行すると、必要なものがインストールされ、しばらくするとAWSへデータを送信し始めます
Downloading AWS IoT Root CA certificate from AWS...
  % Total    % Received % Xferd  Average Speed   Time    Time     Time  Current
                                 Dload  Upload   Total   Spent    Left  Speed
100  1188  100  1188    0     0   3176      0 --:--:-- --:--:-- --:--:--  3176

Cloning the AWS SDK...
Cloning into 'aws-iot-device-sdk-python-v2'...
remote: Enumerating objects: 2910, done.
remote: Counting objects: 100% (1120/1120), done.
remote: Compressing objects: 100% (348/348), done.
remote: Total 2910 (delta 951), reused 818 (delta 772), pack-reused 1790 (from 4)
Receiving objects: 100% (2910/2910), 2.43 MiB | 654.00 KiB/s, done.
Resolving deltas: 100% (1870/1870), done.

Installing AWS SDK...
Looking in indexes: https://pypi.org/simple, https://www.piwheels.org/simple
Processing ./aws-iot-device-sdk-python-v2
Collecting awscrt==0.24.1
  Downloading https://www.piwheels.org/simple/awscrt/awscrt-0.24.1-cp39-cp39-linux_armv6l.whl (8.1 MB)
     |????????????????????????????????| 8.1 MB 3.5 kB/s
Building wheels for collected packages: awsiotsdk
  Building wheel for awsiotsdk (setup.py) ... done
  Created wheel for awsiotsdk: filename=awsiotsdk-1.0.0.dev0-py3-none-any.whl size=75325 sha256=edff30d1d7ef26e4af3574edf791a09226b5308360117191948cc602ebad61a7
  Stored in directory: /home/pi/.cache/pip/wheels/57/8a/03/fcd5c1608a5e08b4275bff9240946219f2e47c4e4077af8864
Successfully built awsiotsdk
Installing collected packages: awscrt, awsiotsdk
Successfully installed awscrt-0.24.1 awsiotsdk-1.0.0.dev0

Running pub/sub sample application...
Connecting to xxxxxxxx.iot.ap-northeast-1.amazonaws.com with client ID 'basicPubSub'...
Connected!
Subscribing to topic 'sdk/test/python'...
Connection Successful with return code: 0 session present: False
Subscribed with QoS.AT_LEAST_ONCE
Sending messages until program killed
Publishing message to topic 'sdk/test/python': Hello World!  [1]
Received message from topic 'sdk/test/python': b'"Hello World!  [1]"'
- ここまででモノの作成は完了です
③ ポリシーを作成(最低限の権限)とデバイス証明書の取得
- セキュリティ → ポリシー
- ポリシーは自動的に作成されていますが、必要に応じて設定変更してください
- 今回は以下を追記します
json
{
  "Version": "2012-10-17",
  "Statement": [
    {
      "Effect": "Allow",
      "Action": [
        "iot:Connect",
        "iot:Publish"
      ],
      "Resource": "arn:aws:iot:<region>:<account-id>:topic/speedtest/topic"
    }
  ]
}
- デバイス証明書を取得します(自動で作成済み)
- セキュリティ → 証明書 → アクション →ダウンロード
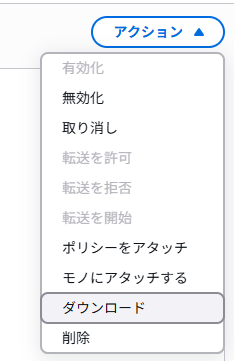
- ダウンロードしたファイルを
device.crtへリネームします - Raspberry Pi の
~/pythonへコピーします
Step4: データ送信用スクリプト(publish_aws.py)
- スピードテストで取得した結果(
tmp.json)をAWSへ送るスクリプトを作成し、~/pythonへ保存します
# 完全動作確認済み:AWS IoT Pub/Sub クライアント
import json
import asyncio
import os
from awscrt import io, mqtt
from awsiot import mqtt_connection_builder

# AWS IoT Core 接続情報
ENDPOINT = "xxxxxxx.iot.ap-northeast-1.amazonaws.com"
CLIENT_ID = "basicPubSub"
PATH_TO_CERT = "./raspi-speedtest.cert.pem"
PATH_TO_KEY = "./raspi-speedtest.private.key"
PATH_TO_ROOT = "./root-CA.crt"
TOPIC = "sdk/test/python"
JSON_PATH = "/home/pi/work/speedtest/tmp.json"

# MQTT 接続初期化
event_loop_group = io.EventLoopGroup(1)
host_resolver = io.DefaultHostResolver(event_loop_group)
client_bootstrap = io.ClientBootstrap(event_loop_group, host_resolver)

mqtt_connection = mqtt_connection_builder.mtls_from_path(
    endpoint=ENDPOINT,
    cert_filepath=PATH_TO_CERT,
    pri_key_filepath=PATH_TO_KEY,
    client_bootstrap=client_bootstrap,
    ca_filepath=PATH_TO_ROOT,
    client_id=CLIENT_ID,
    clean_session=False,
    keep_alive_secs=30
)

class PubSubClient:
    def __init__(self):
        self.message_count = 0
        self.message_limit = 5
        self.loop = asyncio.get_event_loop()
        self.message_event = asyncio.Event()

    def on_message_received(self, topic, payload, **kwargs):
        self.message_count += 1
        print(f"[Subscribe] Message {self.message_count} from '{topic}': {payload.decode()}")
        if self.message_count >= self.message_limit:
            self.loop.call_soon_threadsafe(self.message_event.set)

    async def publisher(self):
        await asyncio.sleep(1)
        if not os.path.exists(JSON_PATH):
            print("[Error] tmp.json が存在しません。終了します。")
            return
        with open(JSON_PATH) as f:
            data = json.load(f)
        message_json = json.dumps(data)
        for i in range(self.message_limit):
            try:
                print(f"[Publish] {i+1}: {message_json}")
                # 修正ポイント: publish() は (Future, packet_id) のタプルを返すため分解
                publish_future, _ = mqtt_connection.publish(
                    topic=TOPIC,
                    payload=message_json,
                    qos=mqtt.QoS.AT_LEAST_ONCE
                )
                await asyncio.wrap_future(publish_future)
                await asyncio.sleep(0.5)
            except Exception as e:
                print(f"[Error] Publish failed at message {i+1}: {e}")
                break

    async def run(self):
        try:
            print("Connecting to AWS IoT...")
            await asyncio.wrap_future(mqtt_connection.connect())
            print("Connected.")

            # 修正ポイント: subscribe() の戻り値は (Future, packet_id)
            subscribe_future, _ = mqtt_connection.subscribe(
                topic=TOPIC,
                qos=mqtt.QoS.AT_LEAST_ONCE,
                callback=self.on_message_received
            )
            await asyncio.wrap_future(subscribe_future)
            print(f"Subscribed to {TOPIC}, waiting for {self.message_limit} messages...")

            await asyncio.gather(self.publisher(), self.message_event.wait())

        except Exception as e:
            print(f"[Error] {e}")

        finally:
            print("Disconnecting...")
            await asyncio.wrap_future(mqtt_connection.disconnect())
            print("Disconnected.")

if __name__ == '__main__':
    client = PubSubClient()
    loop = asyncio.get_event_loop()
    loop.run_until_complete(client.run())
publish_aws.py実行してみる
Connecting to AWS IoT...
Connected.
Subscribed to sdk/test/python, waiting for 5 messages...
[Publish] 1: {"unixtime": 1748333480845, "datetime": "2025/05/27 17:11:20", "down": 30475683, "up": 20677325}
[Subscribe] Message 1 from 'sdk/test/python': {"unixtime": 1748333480845, "datetime": "2025/05/27 17:11:20", "down": 30475683, "up": 20677325}
[Publish] 2: {"unixtime": 1748333480845, "datetime": "2025/05/27 17:11:20", "down": 30475683, "up": 20677325}
[Subscribe] Message 2 from 'sdk/test/python': {"unixtime": 1748333480845, "datetime": "2025/05/27 17:11:20", "down": 30475683, "up": 20677325}
[Publish] 3: {"unixtime": 1748333480845, "datetime": "2025/05/27 17:11:20", "down": 30475683, "up": 20677325}
[Subscribe] Message 3 from 'sdk/test/python': {"unixtime": 1748333480845, "datetime": "2025/05/27 17:11:20", "down": 30475683, "up": 20677325}
[Publish] 4: {"unixtime": 1748333480845, "datetime": "2025/05/27 17:11:20", "down": 30475683, "up": 20677325}
[Subscribe] Message 4 from 'sdk/test/python': {"unixtime": 1748333480845, "datetime": "2025/05/27 17:11:20", "down": 30475683, "up": 20677325}
[Publish] 5: {"unixtime": 1748333480845, "datetime": "2025/05/27 17:11:20", "down": 30475683, "up": 20677325}
[Subscribe] Message 5 from 'sdk/test/python': {"unixtime": 1748333480845, "datetime": "2025/05/27 17:11:20", "down": 30475683, "up": 20677325}
Disconnecting...
Disconnected.
Step5: 自動実行設定(crontab)
bash
crontab -e

0 * * * * /usr/bin/python3 /home/pi/work/speedtest/speed_test.py && /usr/bin/python3 /home/pi/work/speedtest/publish_aws.py
Step6: 動作確認とログチェック
- AWS IoT Core → 「MQTTテストクライアント」 →
speedtest/topicをサブスクライブ Published:のログが表示されることを確認
5. 今後の発展アイデア
- CloudWatch Logs へ蓄積し時系列分析
- Slack / LINE 連携で異常値を通知
- Ambient / Grafana でグラフ可視化
- ルーターやONU異常との突き合わせ分析
まとめ
この記事の手順通りに進めれば、Raspberry PiとAWS IoTを使った通信速度の自動測定&送信システムが誰でも構築できます。
「なんとなく遅い」から卒業して、数値でネット環境を把握しましょう。
次回は グラフ可視化編を公開予定です!


コメント